")
Server-Side Rendering (SSR) is a powerful technique that can significantly improve the performance and SEO of your React applications. In this tutorial, we’ll walk through the steps to implement SSR with React.js. By the end of this guide, you’ll have a better understanding of how SSR works and how to apply it to your projects.
Compared to React.js, Next.js comes with built-in server-side rendering (SSR) capabilities, simplifying the implementation of SSR in React applications.
Contents
What is Server-Side Rendering (SSR)?
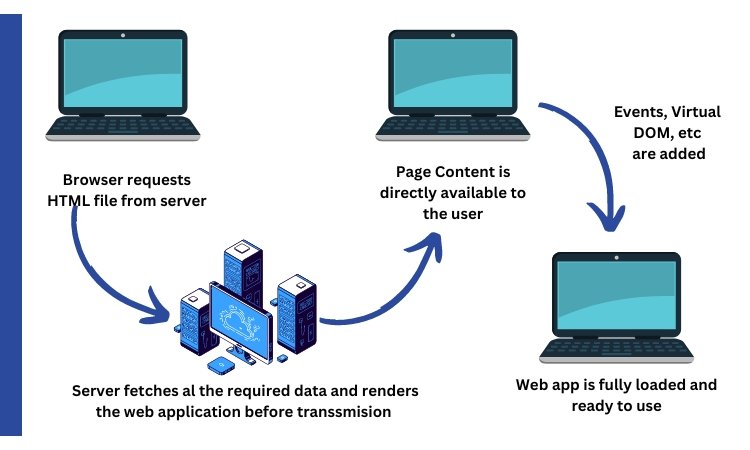
Server-Side Rendering is a technique that allows a web application to render its initial HTML on the server rather than in the browser. This can lead to faster initial page loads and better SEO because search engines can index the content.
Setting Up a React App
Let’s start by setting up a basic React application. You can use create-react-app or any other boilerplate you prefer. Initialize your project, and create a few components and routes for your app.
Creating a Server
To implement SSR, you need a Node.js server that will render your React components on the server. You can use Express.js or any other Node.js server framework. Set up a server file (e.g., server.js) and configure it to serve your React app.
-
- In your project directory, create a new file called
server.js. - Install Express.js, a popular Node.js web framework, if you haven’t already:
- In your project directory, create a new file called
npm install express
- Set up a basic Express server in
server.js. For example:
const express = require('express');
const app = express();
const port = process.env.PORT || 3000;

app.listen(port, () => {
  console.log(`Server is running on port ${port}`);
});
Configuring Webpack for SSR
Webpack is a crucial tool for bundling your client-side and server-side code.
Create separate Webpack configurations for the client and server.
Ensure that the server configuration uses the CommonJS module system, as Node.js does not support ES6 modules by default.
- Install Webpack and related dependencies:
npm install webpack webpack-cli webpack-node-externals
- Create separate Webpack configurations for the client and server in your project. You can name them webpack.client.js and webpack.server.js.
const path = require('path');
const nodeExternals = require('webpack-node-externals');
const HtmlWebpackPlugin = require('html-webpack-plugin');
const { CleanWebpackPlugin } = require('clean-webpack-plugin');

module.exports = (env, argv) => {
  const isDevelopment = argv.mode === 'development';

  return [
    // Server Configuration
    {
      entry: './src/server/index.js', // Entry point for your server code
      target: 'node', // Target environment is Node.js
      node: {
        __dirname: false, // Set __dirname to false to use the correct directory in a Node.js environment
      },
      externals: [nodeExternals()], // Exclude node_modules from the server bundle
      output: {
        path: path.resolve(__dirname, 'dist'), // Output directory for server bundle
        filename: 'server.js',
        publicPath: '/', // Public path for serving assets (used for development server)
      },
      module: {
        rules: [
          {
            test: /\.(js|jsx)$/,
            exclude: /node_modules/,
            use: {
              loader: 'babel-loader', // Transpile JavaScript/JSX using Babel
              options: {
                presets: ['@babel/preset-env', '@babel/preset-react'],
              },
            },
          },
        ],
      },
    },
    // Client Configuration
    {
      entry: './src/client/index.js', // Entry point for your client code
      output: {
        path: path.resolve(__dirname, 'dist'), // Output directory for client bundle
        filename: isDevelopment ? 'client.js' : 'client.[contenthash].js',
        publicPath: '/', // Public path for serving assets (used for development server)
      },
      module: {
        rules: [
          {
            test: /\.(js|jsx)$/,
            exclude: /node_modules/,
            use: {
              loader: 'babel-loader', // Transpile JavaScript/JSX using Babel
              options: {
                presets: ['@babel/preset-env', '@babel/preset-react'],
              },
            },
          },
        ],
      },
      plugins: [
        new HtmlWebpackPlugin({
          template: './src/client/index.html', // HTML template for the client
          filename: 'index.html',
        }),
        new CleanWebpackPlugin(), // Clean the 'dist' directory before building
      ],
    },
  ];
};
This configuration includes two separate Webpack configurations: one for the server bundle and one for the client bundle. The server bundle is configured to target Node.js, exclude node_modules, and output a server.js file.
The client bundle is configured to output an index.html file and a client-side JavaScript bundle. It also includes Babel for transpiling JavaScript and JSX.
Make sure to adjust the entry points, file paths, and other settings according to your project structure and requirements. Additionally, you may need to install the necessary Webpack and Babel dependencies based on your project’s needs.
Implementing SSR in React In your React components,
You’ll need to modify them to support SSR. You can use libraries like react-dom/server to render your components on the server. Create a function that takes a URL, renders the component tree, and returns the HTML.
In your React components, make them SSR-compatible. You can use react-dom/server to render components on the server.
Create a function in your server code (in server.js or a separate file) that takes a URL, renders the component tree, and returns the HTML. Use ReactDOMServer.renderToString() or similar methods.
How to make the React Components SSR compatible
Making React components SSR-compatible involves adapting your components to work both on the server and in the browser. Here’s how you can make your React components SSR-compatible:
1. Avoid Browser-Specific Code:
- Ensure that your components don’t contain code that only works in the browser. For example, don’t access the
windowobject directly in your components, as it’s not available on the server.
2. Use Universal Imports:
- Import dependencies and modules that are used both on the client and server. For example, if you’re using a library like
axiosfor API requests, import it in a way that works in both environments:
// Bad: Imports axios only for the client
import axios from 'axios';

// Good: Imports axios universally
import axios from 'axios/dist/axios';
3. Be Mindful of Lifecycle Methods:
- If you’re using class components, be aware that some lifecycle methods (e.g.,
componentDidMount) are not executed on the server. Use lifecycle methods likecomponentDidMountandcomponentDidUpdatefor client-specific tasks, and consider usingcomponentWillMountfor server-side tasks.
4. Use Hooks and Functional Components:
- If possible, favor functional components and React Hooks (e.g.,
useEffect,useState) over class components and lifecycle methods. Hooks are easier to reason about and work seamlessly in both server and client environments.
5. Use Conditional Rendering:
- Be mindful of conditional rendering in your components. Ensure that components conditionally rendered based on client-specific data or events have graceful fallbacks when rendered on the server. For example:
// Bad: Client-specific condition
{isClient && <ClientComponent />}

// Good: Fallback for server rendering
{isClient ? <ClientComponent /> : <ServerFallback />}
6. Server-Only Logic:
- If you have logic that should only run on the server, wrap it in a conditional check like this:
if (typeof window === 'undefined') {
  // Server-only logic here
}
7. Handle Client-Side Routing:
- If you’re using client-side routing (e.g., React Router), ensure that server-side rendering works with routing. Server routes should match client routes to ensure consistency.
8. Manage State Carefully:
- Be cautious with client-specific state management libraries (e.g., Redux) and ensure that initial states are set appropriately on the server. You may need to prepopulate the initial state with server-side data.
9. Test SSR Compatibility:
- Write tests specifically for SSR to verify that your components render correctly on the server. Tools like Jest and React Testing Library can help you with this.
By following these guidelines and being mindful of the differences between server and client environments, you can make your React components SSR-compatible, ensuring that your application works smoothly on both the server and in the browser.
Data Fetching on the Server
To fetch data on the server, you can use tools like fetch or Axios. Fetch data in your server-rendered component and pass it as props to your React components. This ensures that the initial HTML contains all necessary data.
Testing SSR in Your App
Testing is essential. Set up testing for your SSR components and server-rendering logic. Use tools like Jest and React Testing Library to ensure your app behaves as expected.
Deployment Considerations
When deploying your SSR app, consider factors like environment variables, routing, and error handling. Ensure your server can handle concurrent requests efficiently.
Conclusion
Server-Side Rendering can greatly enhance the performance and SEO of your React applications.
By following this guide, you’ve learned the fundamental steps to implement SSR in React. Remember that SSR is a powerful tool, but it may not be necessary for all projects.
Evaluate your project’s needs and decide if SSR is the right choice.


0 Comments