
Deciding which version of Linux to put on your computer can be hard because there are a lot of options, and each one has its own unique features. One choice that many people like is Ubuntu.
Some say it’s one of the top Linux options out there. It’s easy to use, you can change it how you like, and it can grow with what you need.
This guide will show you how to install Ubuntu with a Graphical User Interface (GUI) on your computer. We’ll also cover what you need and how to set it up.
Contents
Download Ubuntu OS
Installing Ubuntu by wiping out the old operating system is a good way to make sure your computer starts fresh with Ubuntu. It means getting rid of everything on your hard drive and installing a brand new version of Ubuntu.
Let’s compare this method with using a virtual machine:
| Ubuntu Linux on VM | Ubuntu Linux on physical hardware |
|---|---|
| Scalability: Can run multiple Ubuntu installations simultaneously | Can run one Ubuntu installation |
| Support: Needs hardware to support virtualization for VM to work properly | Ubuntu will work on a broader range of hardware |
| Performance: Usually slower because it depends on the host system | Typically better because Ubuntu runs directly on the physical hardware |
| Development: VMs allow for testing environments based on user needs, useful for software development | Reconfiguring the operating system is a long and tedious task, often requiring complete reinstallation |
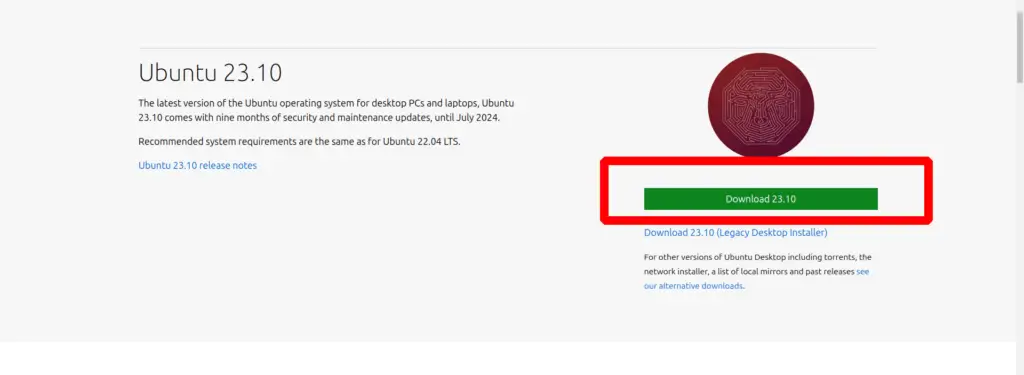
You can access the Ubuntu image download link here. Be sure to save it in a place you’ll remember on your computer!
If you’re installing an earlier version of Ubuntu, like Ubuntu 22.04 LTS, you’ll notice a different visual layout in the installer, but the overall process should remain consistent.
Create a Bootable USB stick to Install Ubuntu
To create a Bootable USB stick for installing Ubuntu Desktop, you’ll need to transfer your downloaded ISO file onto the USB drive using specialized software. Simply copying the ISO file won’t work.
For this guide, we’ll use balenaEtcher, a tool compatible with Linux, Windows, and Mac OS. Select the version that matches your operating system, download it, and install the software.
Once installed, open balenaEtcher and follow these steps:
- Choose your downloaded ISO file.
- Select your USB flash drive.
- Click “Flash!” to begin the installation process.
- This will write the Ubuntu image to your USB stick, making it bootable and ready for installation.
To boot from the USB flash drive
- Insert the USB flash drive into the laptop or PC where you intend to install Ubuntu.
- Restart or power on the device.
- The system should automatically recognize the installation media. If not, try pressing F12 during startup to access the system-specific boot menu.
F12 is commonly used for the boot menu, but alternatives like Escape, F2, and F10 exist. If unsure, look for a brief message during startup indicating which key to press for the boot menu.
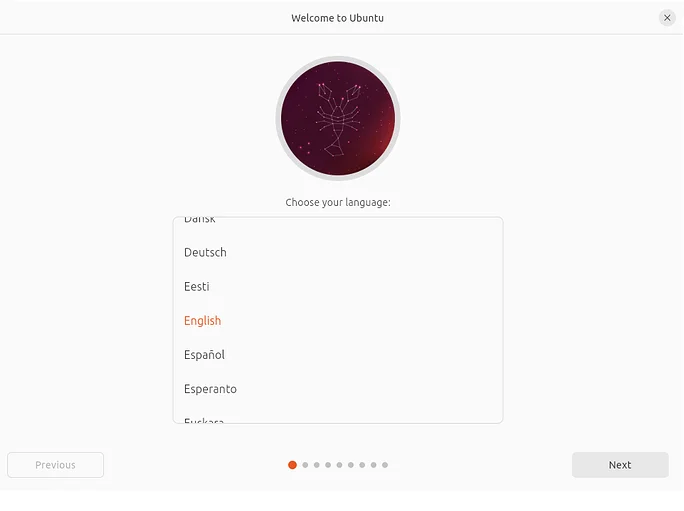
Once the installer initializes:
- Choose your preferred language.

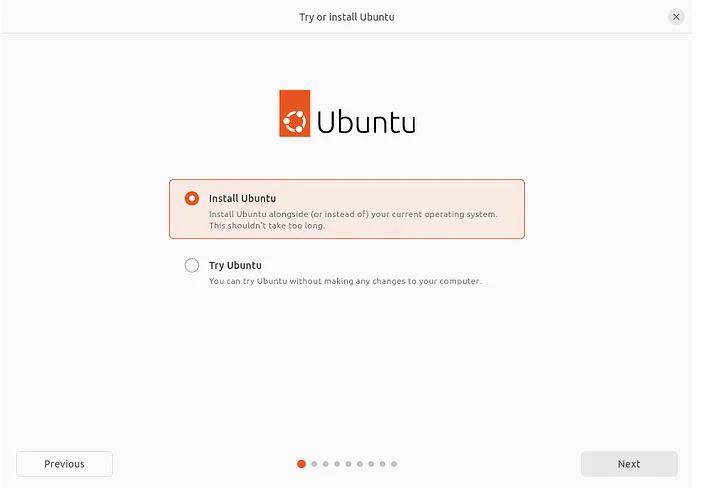
- You’ll be presented with the option to either try or install Ubuntu.
- If you select “Try Ubuntu,” you can explore Ubuntu without altering your PC. You can access the installer menu at any time by clicking the “Install Ubuntu” shortcut on the desktop.
- To proceed with installation, click “Install Ubuntu.”

- Select your keyboard layout and click “Continue.”
- You’ll be prompted to connect to Wi-Fi. This enables Ubuntu to download updates and third-party drivers (e.g., NVIDIA graphics drivers) during installation. Once connected (or if you choose to proceed offline), you can continue with the installation setup.
Note: If you encounter an alert stating “RST is enabled,” it means your PC uses Intel RST (Rapid Storage Technology), which Ubuntu doesn’t support. You’ll need to disable RST in the BIOS menu to proceed. For more information, visit help.ubuntu.com/rst.
Installation Setup:
After selecting your keyboard layout and connecting to Wi-Fi, you’ll be prompted to choose between two installation options:
- Normal Installation: This option includes a standard set of applications and features.
- Minimal Installation: Ideal for users with limited storage space or those who prefer fewer pre-installed applications.

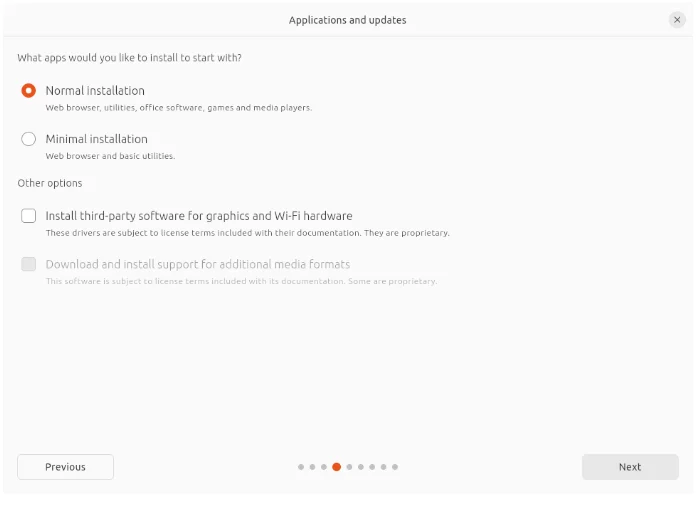
Additionally, under “Other options,” you’ll have the opportunity to enhance device support and performance by downloading updates and third-party software such as Nvidia graphics drivers during the installation process. It’s recommended to check both of these boxes for an optimal Ubuntu experience.
Type of Installation
On this screen, you can configure your Ubuntu installation according to your preferences. Here are the available options:
- Erase Disk and Install Ubuntu: Select this option if you want Ubuntu to be the sole operating system on your hard drive. This will allocate the entire disk space to Ubuntu.
- Install Ubuntu Alongside Another Operating System: If your device already has another operating system installed, this option allows you to install Ubuntu alongside it. You can allocate disk space for Ubuntu using a simple interface with a slider. This option automatically selects the largest partition on the drive. Advanced users can switch to Manual partitioning for more control.
- Encrypt the Entire Drive using LVM: This option, available under Advanced Features, allows you to encrypt your entire drive using Logical Volume Management (LVM). This enhances security but requires you to create a security key for boot authentication.
- Manual Partitioning: Designed for advanced users, this option provides detailed control over drive partitions and configurations. Users can create, manage, and modify partitions according to their specific requirements.
If your device has Windows BitLocker Drive Encryption enabled:
- You’ll receive an alert informing you that Ubuntu cannot gather the necessary drive information to safely install alongside Windows with BitLocker enabled.
- You’ll be prompted to disable BitLocker in Windows before proceeding with the Ubuntu installer.
Note: Disabling Windows BitLocker is unnecessary if you’re fully erasing Windows or if there’s a separate, unencrypted drive available for Ubuntu installation. Refer to the final section of this tutorial for more information.
Ready to Install
After selecting your preferred installation option, clicking “Next” will lead you to a summary of your installation configuration. This summary allows you to review and confirm your setup before proceeding with the installation.
Once you’re satisfied with the configuration, click “Install” to initiate the installation process. Please note that once you proceed with the installation, Ubuntu will start installing in the background, and you won’t be able to return to this point. Make sure to double-check your settings before proceeding.
Choose Your Location
On the map screen, select your location and timezone, then click “Continue.” If you’re connected to the internet, this information will be detected automatically.


0 Comments